… And Possibly Other PowerEdge Models
The 750 typically boots from CD-ROM, hard drive, or PXE boot. But with a quick trip to the BIOS, you can also boot from USB.
First Things First

I made a bootable Ubuntu install on this Western Digital My Passport external hard drive.
Creating a bootable USB is an entirely different discussion that we might cover in a future article. In the meantime, you might want to check out tools such as Unetbootin.
How to Boot from USB on a Dell PowerEdge 750
Once you have your bootable USB device, plug it in to a USB port on your server (the Dell PowerEdge 750 has one USB port on the front and two in the back).
Boot or reboot the machine.
When the Dell splash screen appears, press F2 to enter setup (that is, the BIOS menu). This is where we’ll make the changes to be able to boot from our USB.
In the BIOS menu, scroll down to the option for “USB Flash Drive Emulation Type.” Use the space bar to change this to “Hard disk.”
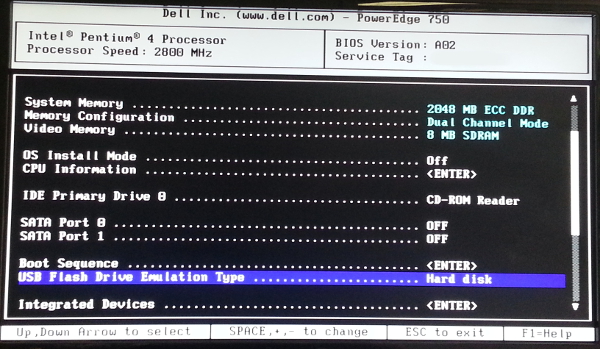
Change the USB Flash Drive Emulation Type to “Hard disk”
Then go to the “Boot Sequence” option and press enter. The USB device will now appear as a hard drive in your boot options. Use the space bar to enable or disable boot options and the + or – keys to change their order in the boot sequence.
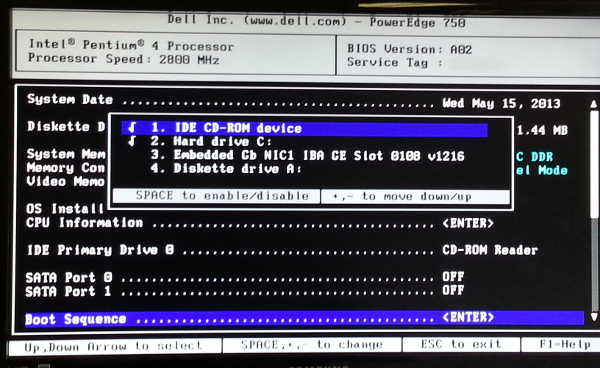
Enable the hard drive in the “Boot Sequence” menu; this is actually the USB drive.
After making these changes in your BIOS settings, press ESC and choose “Save and Exit.” Your server will reboot from your USB device. That’s how to boot from a USB on a Dell PowerEdge 750. Since other models of Dell PowerEdge servers have similar BIOS settings, this process might work on those also.
You fuckin rock. I have been banging my head against a wall with this old server. thank you!
Great!
Its works for me….
Thank you so much and Appreciated your help.
I know this is an old thread but I have been struggling to get my servers upgraded. I have followed these steps and all i keep getting is the servers booting through to the current vmware software they are on…
Any other suggestions in the event of the above not working?